Wednesday, February 21, 2007

Getting Some Stuff off my Chest

After reading my sister's post about CTV's Robson's Arms and their cool decision to put episodes online I decided to check it out. Turns out they've made an uncool decision to exclude Linux users from watching. Clicking on the "Watch Season 1 and 2 on Broadband" link gives me a screen telling me "Sorry, your OS is not supported! We recommend Windows 2000, Windows XP, or Mac OS X."

Even after using the "Change User Agent" option in Firefox to identify as IE 6 under Windows XP I get a message requesting I upgrade to Flash 8. Firstly, I'm running Flash 9. And secondly, if their video player is simply a Flash player why limit viewers to OS X or Windows? Flash plays on Linux as well.

I have also heard that some people are having problems playing the episodes on OS X, and even on Windows it doesn't always play smoothly.

I wrote a message to CTV via an online form last week that assured me all submissions are read by CTV execs, but I'm not holding my breath. As it stands now, I may or may not see the show if it happens to be on at the same time I'm watching TV, but I'm certainly not going to make an effort to seek it out.

I thought I had a similar problem with CBC's website. Quite a while ago my sister had blogged about a spoof of House M. D. that This Hour Has 22 Minutes had done. For some reason it wouldn't work for me. After my CTV problem I started getting all righteous about a broadcaster funded with taxpayer money using proprietary video players that wouldn't run in Linux. That's still true, they should be using H.264 or some other open standard, but it's now working with Firefox combined with the MediaPlayerConnectivity extension in Firefox, so now all my righteous indignation has evaporated.


Sunday, February 11, 2007

Website Review: In Pictures

My mother, while not completely hopeless with computers, does have a certain naivety with them. She once called me in the middle of the night telling me "the internet is down" when her dial-up modem gave her a busy signal. When she said her email client wasn't displaying properly I noticed she had somehow made the window tiny. I fixed it by maximizing its window. The list goes on.

Where she leaves me in the dust, however, is in her understanding of Microsoft Office. We were testing OpenOffice to see if it would replace Microsoft Office for her, and she had lots of questions to which I had no answers. Off we went to the online OpenOffice help and the web.

While we eventually got her questions answered it made me realize how little I know about using an office suite. I use it mainly for opening existing documents, writing letters, and using existing templates for projects such as cards or CD covers. When I was alerted to In Pictures I decided to give them a try.

In Pictures offers tutorials on Microsoft Office 2003, OpenOffice 2.0, Dreamweaver 8, Fireworks 8, and HTML & CSS. They seem to update their tutorials regularly; Fireworks 8 was just recently added, and their website says Office 2007, Photoshop, MySQL, and PHP tutorials are coming soon. They also offer downloadable PDF files and bound books of their tutorials for an additional cost.

Their philosophy is "The simpler, the better." The tutorials are given with black and white screenshots, with red markers showing you points of interest or where to click next. The lessons are given step by step, with explanations of what you are actually doing throughout.

The first tutorial I tried was for OpenOffice's database component Base. I had never used Base before, but while following the tutorial I was amazed at how much I was actually understanding. I was really grasping the concepts, rather than just clicking through the steps. The screenshots show you exactly what to do and the steps are easy to follow, clearly explaining what you are doing.

When I tried the Writer tutorial for OpenOffice I was tempted to skip ahead to the more advanced sections, but decided to plod through from beginning to end. I'm glad I did. While I was bored at first by being shown very basic operations, there were always little things that came up that I never thought of doing. That's one of the valuable things about tutorials. They can show you how to do the things you want to do, but can also show you things you never thought of doing.

Of course, you don't have to start at the beginning. Each tutorial is divided into sections, so you can navigate to the area you are most interested in learning. You already know how to use bullets, but want to use footers to number pages automatically? Just go to the "Employ Headers and Footers" section.

In Pictures has been useful for my mother in learning the differences between Microsoft Office and OpenOffice. She knows all the tasks she needs to complete, she just needs to know how to do them in OpenOffice. The tutorials won't cover all the advanced features she needs, but it will give her confidence and a solid footing.

In Pictures is a great place to get started in learning new software, or in covering gaps of knowledge in software you already use. Worth trying out.

Thursday, February 08, 2007

Warnings for Stupid People

Rediscovered this image of a jar of peanut butter I had scanned a couple of years ago because of the silly warning on it:


Here's a closeup of the warning:


It contains peanuts. People need to be warned that peanut butter contains peanuts, because if they aren't they will sue. "Your Honour, there is no way my client could have known that jar of peanut butter contained any trace of peanuts. She is willing to be branded an idiot for the rest of her life on the chance that you will believe this and make her rich."

Here's another silly one that I just noticed today:


A perfectly ordinary bag of raisins. You can see the real raisins in the clear window in the bottom left of the bag, and the picture of raisins on the bag. In the lower right is this statement:

"Photo Enlarged to Show Texture."

"Ma, get the shotgun. We're goin' back to the store. We bought these new space-age giant raisins and they put little itty bitty ones in the bag instead."

What kind of freakish radioactive genetic experiments would they have to perform to get raisins that large? I don't think I'd eat them even if they did come in that size. Well, I probably would.

[Edit: I guess I didn't make it clear that I've taken the photo of the raisins and the scan of the peanut butter myself. I actually own these foodstuffs. Well, the peanut butter is long gone, but I did own it at one point. Some people seem to think I've taken these photos from some email or website.]

Sunday, February 04, 2007

Make a Movie of Your Linux Desktop

Want to show off your snazzy 3d desktop, or demonstrate the features of your favourite new program? Make a movie of your desktop to capture all your actions, edit it, then add a soundtrack.

You need two pieces of software to accomplish this: xvidcap to capture the video and Avidemux to edit the movie and add a soundtrack. You may also need Audacity to shorten the audio file used for the soundtrack.

If your distribution doesn't have xvidcap in its repositories it can be downloaded from here. Debian and Ubuntu users will be able to use the .deb file, others will have to compile from source. Avidemux is most likely available in your repositories, but can be downloaded from here if it isn't.

It takes quite a bit of your system resources to record video while running applications, so you may have to do a bit of tweaking to get a decent framerate from xvidcap. Recording only part of your desktop will get you a better framerate. Click the "eyedropper" toward the right side of the window, then use the mouse cursor to select a region of the desktop to record. Or, if you want to record the full screen, you can lower the resolution of your monitor.

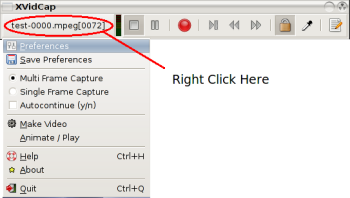
The other thing you can do is tweak the frame rate xvidcap records at. Right click on the file name at the left of the window and select Preferences.

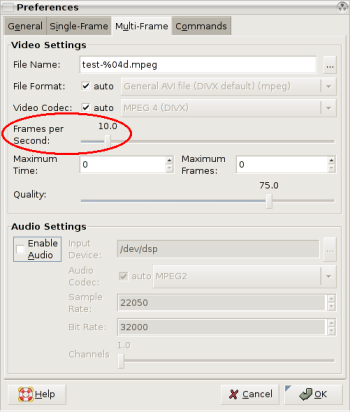
Select the Multi-Frame tab, and lower the frame rate. You may have to experiment a bit with different resolutions and frame rates until you get an acceptable level of quality. You can also change the directory and file name the movie is saved to here.


When you are ready to record click the red Record button. xvidcap will record all your actions to the file specified. When you are finished, press the Stop button. You will be presented with a screen that will tell you the frame rate of your movie. Play it to see what it looks like. If the frame rate is too low it will play very quickly. Do some more adjusting of the frame rate, your resolution, and perhaps record a smaller region to improve the quality.

This is the vidcap I made of my desktop before any editing was done.


Once you are satisfied with the quality of your recording you will probably want to do some editing to remove things like the xvidcap window, long pauses, and stupid mistakes you may have made. We can use Avidemux to do some simple editing.

Open Avidemux, then open your movie. We are going to remove the bits of the movie we don't want. Click the A button at the bottom of the window to select the beginning of the section you wish to remove. In this example we are going to remove the section of the movie that shows me starting xvidcap.


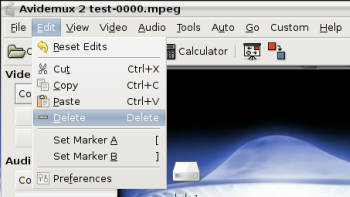
Press Play, Next Frame, or use the scroll bar to go to the end of the part you wish to remove. Click the B button at the bottom of the window to select the end. Click the Edit menu item at the top of the window and select Delete. If you play the movie now you will see that the part you selected between the A and B markers is now gone.


This is a vidcap of the editing of the original vidcap. It's getting recursive now.


Do you want to add a soundtrack? I chose to use the song J-Nic Beatz by Andrew Stevens licensed under a Creative Commons attribution only license to perk up the video a bit. You may have to cut the length of the song down to the length of the video. Audacity is perfect for this.

In Avidemux with the video open select Audio at the top of the window, then Main Track. In the Audio Selector window select External PCM if your sound file is an uncompressed .WAV file, External MP2/3 if it is an MP3 file, or External AC3 if it is an AC3 file. Hit OK, choose the sound file you wish to use, then hit Save.

Here is our final edited Teenage Zombies video with sound.


These techniques can be used in a variety of different ways. Be creative! If you want to do some more advanced editing of your video, try Kino or KDEnlive. Experiment, post your video to the web, burn your new how-to video to DVD, show off what your computer can do.

Do you have any questions or suggestions on making desktop videos? What other programs would you use? Leave a comment or email me.

Saturday, February 03, 2007

Book Review: O'Reilly's Backup & Recovery

"No one cares if you can back up -- only if you can recover."

This is probably the most important point in this book. Using a variety of open source tools, you are shown how to backup, test and restore your Windows, Macintosh, Unix, or Linux systems, including filesystem and database backups. There is even a chapter that will help guide you in choosing a commercial alternative if the open source solutions don't meet your needs.

This is not a book for the beginner. It is aimed at professional systems administrators, although it contains useful information for anybody who needs backups. You should be comfortable with using command line tools and the shell. Having said that, the author (W. Curtis Preston) does an excellent job of explaining the various tools and concepts he presents. There are lots of examples given, and the most fun parts of the book are the real world examples of backups gone wrong.

The first two chapters provide an introduction to the concept of the book and basic backup principles. You are shown why backups are necessary and what should be backed up. Preston explains his philosophy of backing up the entire system, excluding what's not necessary, and automation. There are a lot of eye openers in the beginning chapters, and they should not be missed.

The next chapters cover the open source tools used to do backups and restores. Starting with basic tools such as cpio, dump, dd, tar and rsync for Unix and Linux systems, ditto for Mac OS, and ntbackup and System Restore for Windows, the book continues on with more advanced tools such as Amanda, BackupPC, and Bacula. The reader is walked through each program, with ample explanations and examples given.

How to achieve near-CDP (Continuous Data Protection) with open source tools is given a chapter of its own. rsync with snapshots, rsnapshot, and rdiff-backup are all explained, going over the advantages and disadvantages of each.

Commercial software and hardware are also covered. The author has chosen to not suggest specific utilities, but rather gives guidance on how to choose a backup solution that will meet your needs. The reasoning is that there are so many programs available that are constantly changing that a specific recommendation will soon be obsolete. It seems to be the "if you teach a man to fish" technique. If you are shown what to look for in a backup utility, you can see for yourself the benefits of the various programs available.

Bare-metal recovery, restoring the entire system from the operating system on up, is explained for Linux, Windows, MacOSX, and Solaris, HP-UX, and AIX Unix systems. Preston recommends testing all recoveries, but I found the technique here particularly interesting. He shows how to trash your hard drive so your root filesystem is completely lost. An effective way to see if you can build your system back from scratch. Of course, that's only recommended on a test system, not on an active server.

The chapters on database recovery are very extensive. It is not assumed that the reader is intimately familiar with the structure of databases, and there are plenty of explanations of the concepts of relational databases and the problems with backing them up. Oracle, Sybase, DB2, SQL Server, Exchange, PostgreSQL, and MySQL are all covered, sometimes with multiple backup solutions.

The final part of the book covers VMware, volatile filesystems, and other bits and pieces that didn't fit into the rest of the book.

A companion website is provided at backupcentral.com to cover additional material that didn't make it into the book as well as detailing changes that have happened since publication. A searchable online Safari version is also offered for a 45 day free trial.

Backup & Recovery is clearly written and is full of excellent advice and information. If you need to be able to get your system up after a disaster, you need this book.