Showing posts with label windows. Show all posts

Sunday, April 01, 2007

Non-Destructive Partitioning with GParted

"Grandpa, tell me a story."

"Okay, little Percival, let me tell you what partitioning was like in the old days. If you already had information on your hard drive, but wanted to re-partition it, all your data would be erased. There were programs available that would partition your drive without erasing all your stuff, but they cost money."

"Gee, Grandpa, that story sure did suck."

It's true. That story did suck. But it's also true that, unless you really, really knew what you were doing and were willing to spend a lot of time on it, repartitioning your hard drive would destroy your data. Commercial programs were (and still are) available to partition your drive without data loss, but they cost money. If repartitioning your hard drive is something you only do once in rare while (and for most of us it is) free tools may be a better option.

Let's back up a bit. What is partitioning and why would you want to repartition? In the simplest terms, partitions are separate areas on your hard drive. In Windows a single hard drive can be partitioned to look like separate drives, so that what appears to be drive C:, drive D:, and drive E: may all be separate areas of a single physical drive. In Linux they may appear as hda1, hda2, and so on. There are many reasons why a hard drive may be partitioned, but a very common one is to keep the operating system and user data separate. In this way if the operating system is to be upgraded or restored the user's data doesn't have to be touched, lessening the risk of data loss. Another reason is to control damage from runaway files. In Linux most log files are kept in the /var folder. Sometimes servers are set up to put /var in a separate partition. If a runaway process starts filling up a log file it can only fill up the partition /var is on, leaving the free space on the other partitions untouched.

GParted is a free utility that allows you to partition your hard drive without destroying your data. It is a Linux program, but can be used to partition filesystems for Windows (FAT16, FAT32, NTFS) and Mac OS X (HFS, HFS+) as well. A full listing of the filesystems and operations available can be found here.

GParted does many checks and is very safe, but keep in mind that the partitioning process is only non-destructive if everything goes well. I think GParted says it best with the message it gives you if you try to run as a regular user:


Always back up your data before major operations on your hard drive.

Even if you're not running Linux on your computer, you can still use GParted by booting from the LiveCD. The LiveCD is a small image (about 50 MB) that contains a stripped down version of the Gentoo Linux operating system, the Fluxbox window manager, and GParted. It's probably the easiest way to partition your hard drive, as you won't have to worry about unmounting partitions. It is dangerous to modify a mounted partition, and using the LiveCD ensures all partitions are unmounted unless you explicitly mount them.

Download the iso image and burn it to a CD. If you're running Windows your CD burning program should have an option to "Burn Image to Disc" or something similar. Don't just burn it as a data disk; it won't work. In Linux, if you're using Gnome, just right click the iso image and select "Write to Disc." With KDE right click the image and select "Actions," then "Write CD Image with K3B." Burn the CD, put it in the CD tray, and reboot.

You'll see a screen like this:


Just select the first option (GParted LiveCD) with the arrow keys and press Enter. You'll be prompted to hit Enter a couple more times to accept the default language and keyboard template. Once the boot process is complete you will see this:


A list of partitions on your hard drive will be listed. Mine looked like this:


I have four partitions on one hard drive: hda1, hda2, hda3, and hda4. Only four primary partitions are allowed on a single hard drive, so hda4 is made as an extended partition, with hda5 and hda6 under it. Don't worry too much about what extended partitions are. They are primary partitions that are partitionable, allowing you to fit more than four partitions on a single hard drive.

My problem was that the partition my operating system was on, hda2, was too small at about 5 GB. I wanted it to be twice that size. I needed to take some space from my data partition, hda3, and give it to my operating system. The first thing I needed to do was resize the data partition, hda3. Highlight the partition you want to shrink, and click Resize/Move. You will see a graph representing the partition, as well as some fields telling you how much space available. We have the option of freeing up space either before or after the partition. The partition we want to give the space to (hda2) is before, so grab the left arrow with the mouse and move it until enough space is freed.


We've moved the arrow until about 5 GB is freed in front. The new free space is represented by the gray area directly to the left of the the arrow. Rather than moving the arrow, you could also have entered the amount of space you wanted directly into the "Free Space Preceding" form.


Click the Resize/Move button.

Now let's select the partition we want to enlarge, hda2. Click Resize/Move, and there will be a window similar to what we've seen before. We want to use the freed space immediately following the partition, so grab the right arrow and pull it all the way to the right.


You will see the extended graph cover all the available space, with the new space being about twice as large as it was before.


Again, click Resize/Remove.

Now that we've told GParted what to do, we're going to tell it to go ahead and do it. Click on Apply, and you'll see a final warning:


If you're sure you've backed up all your data and that you want to do this, click Apply.

Using a graphical tool like GParted hides a lot of the complexity of partitioning. The first operation we asked it to do, freeing up space in front of the partition, actually involves resizing and moving the partition. A lot of data has to be checked and copied, so it takes some time. For this operation, resizing two partitions by 5 GB and moving one, it took a little over two hours. Operations involving moving more data and more partitions will take longer.

Now you can tell your grandchildren about how easy free software made it to repartition your hard drive. Your stories will still suck, but at least your data is safe.

Saturday, February 03, 2007

Book Review: O'Reilly's Backup & Recovery

"No one cares if you can back up -- only if you can recover."

This is probably the most important point in this book. Using a variety of open source tools, you are shown how to backup, test and restore your Windows, Macintosh, Unix, or Linux systems, including filesystem and database backups. There is even a chapter that will help guide you in choosing a commercial alternative if the open source solutions don't meet your needs.

This is not a book for the beginner. It is aimed at professional systems administrators, although it contains useful information for anybody who needs backups. You should be comfortable with using command line tools and the shell. Having said that, the author (W. Curtis Preston) does an excellent job of explaining the various tools and concepts he presents. There are lots of examples given, and the most fun parts of the book are the real world examples of backups gone wrong.

The first two chapters provide an introduction to the concept of the book and basic backup principles. You are shown why backups are necessary and what should be backed up. Preston explains his philosophy of backing up the entire system, excluding what's not necessary, and automation. There are a lot of eye openers in the beginning chapters, and they should not be missed.

The next chapters cover the open source tools used to do backups and restores. Starting with basic tools such as cpio, dump, dd, tar and rsync for Unix and Linux systems, ditto for Mac OS, and ntbackup and System Restore for Windows, the book continues on with more advanced tools such as Amanda, BackupPC, and Bacula. The reader is walked through each program, with ample explanations and examples given.

How to achieve near-CDP (Continuous Data Protection) with open source tools is given a chapter of its own. rsync with snapshots, rsnapshot, and rdiff-backup are all explained, going over the advantages and disadvantages of each.

Commercial software and hardware are also covered. The author has chosen to not suggest specific utilities, but rather gives guidance on how to choose a backup solution that will meet your needs. The reasoning is that there are so many programs available that are constantly changing that a specific recommendation will soon be obsolete. It seems to be the "if you teach a man to fish" technique. If you are shown what to look for in a backup utility, you can see for yourself the benefits of the various programs available.

Bare-metal recovery, restoring the entire system from the operating system on up, is explained for Linux, Windows, MacOSX, and Solaris, HP-UX, and AIX Unix systems. Preston recommends testing all recoveries, but I found the technique here particularly interesting. He shows how to trash your hard drive so your root filesystem is completely lost. An effective way to see if you can build your system back from scratch. Of course, that's only recommended on a test system, not on an active server.

The chapters on database recovery are very extensive. It is not assumed that the reader is intimately familiar with the structure of databases, and there are plenty of explanations of the concepts of relational databases and the problems with backing them up. Oracle, Sybase, DB2, SQL Server, Exchange, PostgreSQL, and MySQL are all covered, sometimes with multiple backup solutions.

The final part of the book covers VMware, volatile filesystems, and other bits and pieces that didn't fit into the rest of the book.

A companion website is provided at backupcentral.com to cover additional material that didn't make it into the book as well as detailing changes that have happened since publication. A searchable online Safari version is also offered for a 45 day free trial.

Backup & Recovery is clearly written and is full of excellent advice and information. If you need to be able to get your system up after a disaster, you need this book.

Monday, January 01, 2007

Free Movies Redux


This is an edit of a previous post that I've changed to concentrate on Windows and VCDs (Video CDs) at the request of a friend.

First we want to get a movie that we can burn to a CD. A great source of free, public domain movies is Public Domain Torrents. You will need a bittorrent client to download the movies. uTorrent is what I use for Windows. For this example I've chosen to download Night of the Living Dead. It will take a few hours, perhaps overnight or longer, to download a movie depending on your connection speed and the size of the movie.

Once the movie is downloaded we have to convert it to a format that is readable by DVD players. We're going to use Avidemux. You can download the Windows version from here.

There are two types of VCDs: regular VCDs have a resolution of 352 x 240, about the same quality as VHS tapes, or Super VCDs that have 480 x 480 resolution, higher quality but will take more space than a regular VCD. A movie that might fit on one CD as a VCD will need to be put on two or more CDs if it is a Super VCD.

Also, not all DVD players will play SVCDs, but most will play VCDs. Check the specs of your player.

Once you've installed Avidemux open the movie, select Auto -> VCD or SVCD, hit Save, and relax for a couple of hours while it converts the movie.


Avidemux will automatically split the movie into two or more files so they will fit on a CD.

Once Avidemux is finished you should be able to burn the files to CDs with your CD burning program. Details will depend on your CD burning software, but I believe most CD burning programs will give you an option to burn VCDs. You may need a separate plugin to burn SVCDs because of licensing issues with the MPEG2 codec.

There are some other great resources for making video VCDs. The Internet Archive is another great source for public domain movies. Files are downloaded directly from their servers, so you don't need a bittorrent client, but sometimes can be slow. The video quality of the movies is also less, but there are a lot of them.

Sunday, November 26, 2006

Free Movies

Lots of free stuff in this post. Free software, free movies, free DVDs. Well almost. You have to supply the DVDs.

The software used in these steps will work for both Windows and Linux users, since most of it is cross-platform. Except where it isn't. But I'll let you know.

First we want to get a movie that we can burn to a DVD. A great source of free, public domain movies is Public Domain Torrents. You will need a bittorrent client to download the movies. For Windows I use uTorrent, in Linux I've started using KTorrent which has a lot of great features. For this example I've chosen to download Night of the Living Dead. It will take a few hours, perhaps overnight or longer, to download a movie depending on your connection speed and the size of the movie.

Once the movie is downloaded we have to convert it to an MPEG2 format that is readable by DVD players. We're going to use Avidemux. In Linux it's probably available in your package manager (it's in the Ubuntu repositories), and there is a Windows version.

Open the movie, select Auto -> DVD, hit Save, and relax for a couple of hours while it converts the movie.


Now the DVD has to be authored, which means we have to add menus and have the file system set up so a DVD player can read the disc.

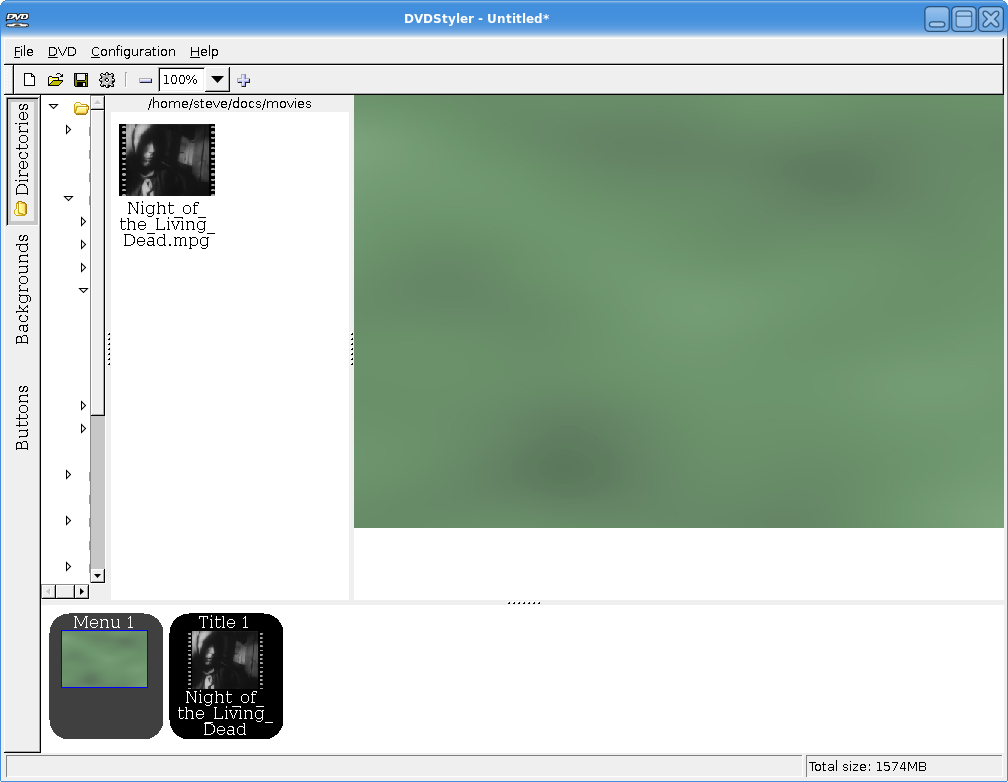
I had a lot of trouble deciding between different applications for authoring a DVD because there are so many good ones. I decided to focus on DVDStyler because it's easy to use, can create good looking menus, and is cross-platform, so it can work on both Windows and Linux. Oh yeah, and it's free. [Edit: The wxsvg library is now required for Linux users. You can download it from the DVDStyler website.]

Installation is easy. Windows users just download and run the Win32 binary on the download page. Linux users may have it in their package manager. It's not in the Ubuntu repositories, so I downloaded the Debian package and installed it.

For Ubuntu Linux users: Dapper users shouldn't need to change anything, but because I'm running Edgy Eft I did have to change an option in the settings because it kept throwing me an error about "jpegtopnm" [Update: These settings shouldn't have to be changed under Feisty Fawn]. To fix this you have to go to Configuration -> Settings, and in the Core tab change the first line to:

jpegtopnm "$FILE_IN" | ppmtoy4m -n 1 -I t -L $FRAME_RATE -S 420mpeg2 | mpeg2enc -f 8 -b $BITRATE -o "$FILE_OUT" $VIDEO_NORM

Don't worry, it's not as scary as it looks. Just copy and paste it in, you don't have to know what it means.

There are some excellent manuals and a forum to help you get started, but I'll go over the basics.

First thing we are going to do is choose a background for the menu. It comes with a bunch of backgrounds, but you can import your own if you like. Click the Backgrounds tab on the left and select the one you want.


Now select the Directories button on the left and navigate to the directory you saved the converted movie to. Only valid MPEG2 files will be available to select. Select your movie.


Now let's click the Buttons tab. Drag the "button1" image to the right, right click it, and select Properties. Since there is only one video on this disc the only thing we have to change is the button label, and the font if you wish.


Now you can select File -> Burn DVD from the main menu. Select Burn if you want to burn a disc right away, or you can Just Generate the file system or Create ISO Image if you want to burn the DVD with another program such as K3B.


After a few minutes you should be able to watch your shiny new DVD movie.

There are some other great resources for making video DVDs. The Internet Archive is another great source for public domain movies. Files are downloaded directly from their servers, so you don't need a bittorrent client, but sometimes can be slow. The video quality of the movies is also less, but there are a lot of them.

For authoring DVDs there is also DeVeDe which converts and authors the DVD, eliminating the need for a program like Avidemux. It is simple to use and can automatically divide a movie into chapters. It doesn't create menus though, and is only for Linux.

Tovid is another Linux only program that also converts movies and authors DVDs and allows you to create simple menus. I've had occasional weird issues with the sound not syncing. I can correct this by fast forwarding through part of the movie. It may be an issue with my DVD player. Well worth a try.


Sunday, September 24, 2006

Ebooks in Linux and Windows

I've owned a Palm OS device in one form or another for a few years now. My first Palm was a Palm m500 that I bought on sale on a whim, without really considering whether or not I had a use for one.

I was a little worried about my girlfriend's reaction, and was sure she was going to give me shit for wasting money. Turns out she loved it. She is very organized and keeps a notebook full of lists of things she needs to accomplish, and thought this would be a good replacement.

When I told her I was worried she would think it was a waste of money she said, "It is for you!" I ended up giving her the Palm and bought a Sony Clie PEG-SJ20 for myself. My girlfriend found she still preferred keeping lists in her notebook, but used it as an address book and for playing games like Bejeweled.

The SJ20 turned out to be perfect for what I eventually ended up using it for: ebooks. The screen, although black and white, was high resolution and very readable even with the backlight on. The m500 screen turned into horrible green-on-black letters with the backlight on, good enough for casual use but not for sustained reading.

I am able to store literally dozens of books on my Palm in a package small enough that I can always have reading material available to me whether I am waiting in line, on the bus, or in bed. My Palm was invaluable when I would go out of town for work.

I found lots of sources for ebooks, but it took me awhile to find ways to be able to read them on my Palm. If an ebook is available in a Palm format it is very easy, but sometimes an ebook has to be converted into a Palm-readable format.

There are lots of different readers for the Palm but I have two that seem to cover everything. I use eReader for books already formatted for that reader. It's a free program, but there's a pro version available with a couple of more bells and whistles. I find the free version does everything I need.

I also use Plucker, which contains a reader that installs on the Palm and desktop software that will convert text or HTML files to Plucker-readable files. It will also allow you to download webpages for later viewing on your Palm. It available for both Linux and Windows.

OpenOffice can read RTF, text, HTML, .doc (Word) and many other formats and save them in Aportisdoc format, which can be read by eReader. Of course, it is also a full featured office suite. Also available for both Linux and Windows.

.lit files are a proprietary Microsoft format that is mostly used with PocketPCs. To be able to read them on my Palm I first run them through the unfortunately acronymed Convert LIT. For Windows I use the freeware ABC Amber LIT Converter. Each of these programs "explodes" the .lit file into HTML and jpg files, which can then be converted with Plucker.

Of course, once the files are ready they have to be transferred to the Palm. I use KPilot, which is a Palm Desktop replacement for Linux. There are others available, but KPilot has been the most reliable and easiest to use for me.

If you have any questions about converting, transferring, or using ebooks with a Palm feel free to contact me through email or the comments. I'll try to help you as best I can.