Showing posts with label movies. Show all posts

Sunday, January 21, 2007

Simple DVD Re-Authoring in Linux

The other night I sat down with my girlfriend to watch Lord of the Rings: Fellowship of the Ring. It's one of the few movies we both enjoy and can watch over and over again. I noticed an odd thing after I inserted the DVD, however. The movie went straight to the menu. There were no previews, no studio splash screens, no advertisements, no videos telling me not to steal this movie that I had already paid for. It was refreshing.

Sometimes, though, when you put in a DVD you are subjected to endless previews, piracy warnings, and splash screens that can last minutes before you finally get to the menu. It's not too bad when you can skip them, but some DVDs disable the "next" button, forcing you to sit through them.

If it's a movie you only watch once or twice it may not be a big deal, but if it's one you want to see over and over again it is especially irritating. When this is done with kid's movies it's almost unforgivable, as they tend to enjoy watching the same video many times.

K9Copy will allow you to re-author your annoying, but beloved, DVD to skip all the content that annoys you, while letting you keep the movie and extras that you enjoy, resizing the movie to fit on a 4.7 GB disc if necessary. It will also let you put the original DVD away from harm. Any horrible accidents involving your DVD, peanut butter, and the dog will be restricted to the copy.

K9Copy should be available in your distribution's repositories. If not, there are packages for various distributions here.

We are going to re-author Shrek 2. It's a great movie, but there are almost 5 minutes of splash screens and previews before you are allowed to get to the menu, and they are not skippable. We're going to make a good DVD even better.

Insert the DVD into your DVD drive and open K9Copy. If you don't see a list of the DVD titles in the window, clicking on the folder at the top left will open the DVD.


Click on the top box beside the DVD disc title, in this case where it says SHREK_2. This will select all the titles, and we can now remove the ones we don't want.


Now we have a long list of titles, but what are they? Which to keep, and which to pitch? If you highlight a title (not a titleset) and press the camera icon at the top, it will play that title for you.


The first six titles (titlesets one through four) are either blank or annoying previews and splashscreens. We can uncheck those titlesets, and the movie and extras we want to keep will be intact.

If you want to keep the original menus, check the Keep original menus box at the bottom left hand corner, otherwise K9Copy will reauthor the DVD with no menus. If you decide to go with no menus you can select the order in which the titles will be played in the right pane of the window.


I only have the one DVD drive, and K9Copy has a nasty habit of crashing on me when the output device I select is the same as the input device, so I'm selecting ISO Image as the output, and we'll burn it to DVD separately.

Click on the DVD icon on the toolbar, and select where to save the ISO image. You'll have time for a coffee now, so go ahead. We'll wait.


We're almost done. Insert a blank DVD. If you use Gnome you can open Nautilus (the file manager), find the ISO image and right click it. Choose Write to Disc, and Nautilus will burn the image for you.

It's almost as easy in KDE. Right click the ISO image in Konqueror, select Actions, then Write CD Image with K3B.

Now you can watch the content you paid for in the way you want to, giving you back control of your DVD player.

Do you have any other suggestions or questions? Let me know by leaving a comment or emailing me.

Monday, January 01, 2007

Free Movies Redux


This is an edit of a previous post that I've changed to concentrate on Windows and VCDs (Video CDs) at the request of a friend.

First we want to get a movie that we can burn to a CD. A great source of free, public domain movies is Public Domain Torrents. You will need a bittorrent client to download the movies. uTorrent is what I use for Windows. For this example I've chosen to download Night of the Living Dead. It will take a few hours, perhaps overnight or longer, to download a movie depending on your connection speed and the size of the movie.

Once the movie is downloaded we have to convert it to a format that is readable by DVD players. We're going to use Avidemux. You can download the Windows version from here.

There are two types of VCDs: regular VCDs have a resolution of 352 x 240, about the same quality as VHS tapes, or Super VCDs that have 480 x 480 resolution, higher quality but will take more space than a regular VCD. A movie that might fit on one CD as a VCD will need to be put on two or more CDs if it is a Super VCD.

Also, not all DVD players will play SVCDs, but most will play VCDs. Check the specs of your player.

Once you've installed Avidemux open the movie, select Auto -> VCD or SVCD, hit Save, and relax for a couple of hours while it converts the movie.


Avidemux will automatically split the movie into two or more files so they will fit on a CD.

Once Avidemux is finished you should be able to burn the files to CDs with your CD burning program. Details will depend on your CD burning software, but I believe most CD burning programs will give you an option to burn VCDs. You may need a separate plugin to burn SVCDs because of licensing issues with the MPEG2 codec.

There are some other great resources for making video VCDs. The Internet Archive is another great source for public domain movies. Files are downloaded directly from their servers, so you don't need a bittorrent client, but sometimes can be slow. The video quality of the movies is also less, but there are a lot of them.

Sunday, November 26, 2006

Free Movies

Lots of free stuff in this post. Free software, free movies, free DVDs. Well almost. You have to supply the DVDs.

The software used in these steps will work for both Windows and Linux users, since most of it is cross-platform. Except where it isn't. But I'll let you know.

First we want to get a movie that we can burn to a DVD. A great source of free, public domain movies is Public Domain Torrents. You will need a bittorrent client to download the movies. For Windows I use uTorrent, in Linux I've started using KTorrent which has a lot of great features. For this example I've chosen to download Night of the Living Dead. It will take a few hours, perhaps overnight or longer, to download a movie depending on your connection speed and the size of the movie.

Once the movie is downloaded we have to convert it to an MPEG2 format that is readable by DVD players. We're going to use Avidemux. In Linux it's probably available in your package manager (it's in the Ubuntu repositories), and there is a Windows version.

Open the movie, select Auto -> DVD, hit Save, and relax for a couple of hours while it converts the movie.


Now the DVD has to be authored, which means we have to add menus and have the file system set up so a DVD player can read the disc.

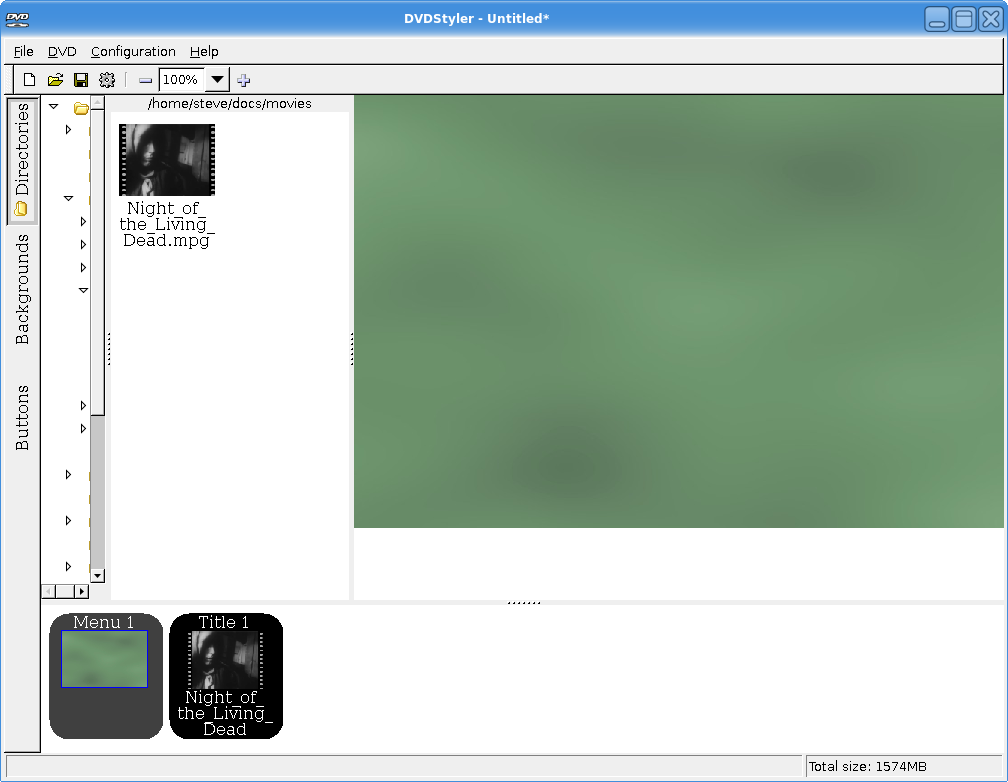
I had a lot of trouble deciding between different applications for authoring a DVD because there are so many good ones. I decided to focus on DVDStyler because it's easy to use, can create good looking menus, and is cross-platform, so it can work on both Windows and Linux. Oh yeah, and it's free. [Edit: The wxsvg library is now required for Linux users. You can download it from the DVDStyler website.]

Installation is easy. Windows users just download and run the Win32 binary on the download page. Linux users may have it in their package manager. It's not in the Ubuntu repositories, so I downloaded the Debian package and installed it.

For Ubuntu Linux users: Dapper users shouldn't need to change anything, but because I'm running Edgy Eft I did have to change an option in the settings because it kept throwing me an error about "jpegtopnm" [Update: These settings shouldn't have to be changed under Feisty Fawn]. To fix this you have to go to Configuration -> Settings, and in the Core tab change the first line to:

jpegtopnm "$FILE_IN" | ppmtoy4m -n 1 -I t -L $FRAME_RATE -S 420mpeg2 | mpeg2enc -f 8 -b $BITRATE -o "$FILE_OUT" $VIDEO_NORM

Don't worry, it's not as scary as it looks. Just copy and paste it in, you don't have to know what it means.

There are some excellent manuals and a forum to help you get started, but I'll go over the basics.

First thing we are going to do is choose a background for the menu. It comes with a bunch of backgrounds, but you can import your own if you like. Click the Backgrounds tab on the left and select the one you want.


Now select the Directories button on the left and navigate to the directory you saved the converted movie to. Only valid MPEG2 files will be available to select. Select your movie.


Now let's click the Buttons tab. Drag the "button1" image to the right, right click it, and select Properties. Since there is only one video on this disc the only thing we have to change is the button label, and the font if you wish.


Now you can select File -> Burn DVD from the main menu. Select Burn if you want to burn a disc right away, or you can Just Generate the file system or Create ISO Image if you want to burn the DVD with another program such as K3B.


After a few minutes you should be able to watch your shiny new DVD movie.

There are some other great resources for making video DVDs. The Internet Archive is another great source for public domain movies. Files are downloaded directly from their servers, so you don't need a bittorrent client, but sometimes can be slow. The video quality of the movies is also less, but there are a lot of them.

For authoring DVDs there is also DeVeDe which converts and authors the DVD, eliminating the need for a program like Avidemux. It is simple to use and can automatically divide a movie into chapters. It doesn't create menus though, and is only for Linux.

Tovid is another Linux only program that also converts movies and authors DVDs and allows you to create simple menus. I've had occasional weird issues with the sound not syncing. I can correct this by fast forwarding through part of the movie. It may be an issue with my DVD player. Well worth a try.