Showing posts with label free software. Show all posts

Sunday, April 01, 2007

Non-Destructive Partitioning with GParted

"Grandpa, tell me a story."

"Okay, little Percival, let me tell you what partitioning was like in the old days. If you already had information on your hard drive, but wanted to re-partition it, all your data would be erased. There were programs available that would partition your drive without erasing all your stuff, but they cost money."

"Gee, Grandpa, that story sure did suck."

It's true. That story did suck. But it's also true that, unless you really, really knew what you were doing and were willing to spend a lot of time on it, repartitioning your hard drive would destroy your data. Commercial programs were (and still are) available to partition your drive without data loss, but they cost money. If repartitioning your hard drive is something you only do once in rare while (and for most of us it is) free tools may be a better option.

Let's back up a bit. What is partitioning and why would you want to repartition? In the simplest terms, partitions are separate areas on your hard drive. In Windows a single hard drive can be partitioned to look like separate drives, so that what appears to be drive C:, drive D:, and drive E: may all be separate areas of a single physical drive. In Linux they may appear as hda1, hda2, and so on. There are many reasons why a hard drive may be partitioned, but a very common one is to keep the operating system and user data separate. In this way if the operating system is to be upgraded or restored the user's data doesn't have to be touched, lessening the risk of data loss. Another reason is to control damage from runaway files. In Linux most log files are kept in the /var folder. Sometimes servers are set up to put /var in a separate partition. If a runaway process starts filling up a log file it can only fill up the partition /var is on, leaving the free space on the other partitions untouched.

GParted is a free utility that allows you to partition your hard drive without destroying your data. It is a Linux program, but can be used to partition filesystems for Windows (FAT16, FAT32, NTFS) and Mac OS X (HFS, HFS+) as well. A full listing of the filesystems and operations available can be found here.

GParted does many checks and is very safe, but keep in mind that the partitioning process is only non-destructive if everything goes well. I think GParted says it best with the message it gives you if you try to run as a regular user:


Always back up your data before major operations on your hard drive.

Even if you're not running Linux on your computer, you can still use GParted by booting from the LiveCD. The LiveCD is a small image (about 50 MB) that contains a stripped down version of the Gentoo Linux operating system, the Fluxbox window manager, and GParted. It's probably the easiest way to partition your hard drive, as you won't have to worry about unmounting partitions. It is dangerous to modify a mounted partition, and using the LiveCD ensures all partitions are unmounted unless you explicitly mount them.

Download the iso image and burn it to a CD. If you're running Windows your CD burning program should have an option to "Burn Image to Disc" or something similar. Don't just burn it as a data disk; it won't work. In Linux, if you're using Gnome, just right click the iso image and select "Write to Disc." With KDE right click the image and select "Actions," then "Write CD Image with K3B." Burn the CD, put it in the CD tray, and reboot.

You'll see a screen like this:


Just select the first option (GParted LiveCD) with the arrow keys and press Enter. You'll be prompted to hit Enter a couple more times to accept the default language and keyboard template. Once the boot process is complete you will see this:


A list of partitions on your hard drive will be listed. Mine looked like this:


I have four partitions on one hard drive: hda1, hda2, hda3, and hda4. Only four primary partitions are allowed on a single hard drive, so hda4 is made as an extended partition, with hda5 and hda6 under it. Don't worry too much about what extended partitions are. They are primary partitions that are partitionable, allowing you to fit more than four partitions on a single hard drive.

My problem was that the partition my operating system was on, hda2, was too small at about 5 GB. I wanted it to be twice that size. I needed to take some space from my data partition, hda3, and give it to my operating system. The first thing I needed to do was resize the data partition, hda3. Highlight the partition you want to shrink, and click Resize/Move. You will see a graph representing the partition, as well as some fields telling you how much space available. We have the option of freeing up space either before or after the partition. The partition we want to give the space to (hda2) is before, so grab the left arrow with the mouse and move it until enough space is freed.


We've moved the arrow until about 5 GB is freed in front. The new free space is represented by the gray area directly to the left of the the arrow. Rather than moving the arrow, you could also have entered the amount of space you wanted directly into the "Free Space Preceding" form.


Click the Resize/Move button.

Now let's select the partition we want to enlarge, hda2. Click Resize/Move, and there will be a window similar to what we've seen before. We want to use the freed space immediately following the partition, so grab the right arrow and pull it all the way to the right.


You will see the extended graph cover all the available space, with the new space being about twice as large as it was before.


Again, click Resize/Remove.

Now that we've told GParted what to do, we're going to tell it to go ahead and do it. Click on Apply, and you'll see a final warning:


If you're sure you've backed up all your data and that you want to do this, click Apply.

Using a graphical tool like GParted hides a lot of the complexity of partitioning. The first operation we asked it to do, freeing up space in front of the partition, actually involves resizing and moving the partition. A lot of data has to be checked and copied, so it takes some time. For this operation, resizing two partitions by 5 GB and moving one, it took a little over two hours. Operations involving moving more data and more partitions will take longer.

Now you can tell your grandchildren about how easy free software made it to repartition your hard drive. Your stories will still suck, but at least your data is safe.

Wednesday, March 21, 2007

Installing and Upgrading and Repartitioning, Oh My

Decided it was time to repartition my hard drive, to take advantage of a rarely used NTFS partition, and to finally give my /home directory it's own place. Normally I'd save excitement like this for a Saturday night, but I have a day off work and thought I'd save Saturday for the girlfriend. Time will tell if I made the right decision.

If I'm going to repartition, I might as well upgrade my Ubuntu Edgy Eft to the new Feisty Fawn. Did a lazy backup of my home directory, just copied it over to a FAT32 partition on the same hard drive. For some reason my emails wouldn't copy over, possibly due to some FAT32 naming restrictions (they had names similar to 1165045363.8505.rPeh8:2,S.) Didn't feel like burning them to a DVD, so I just transferred them over to the server with sftp (Thanks Mom!)

Downloaded the image for Feisty, burned it, put in in the DVD tray, and rebooted. The cd comes as a live CD, like Edgy and Dapper. I didn't use the live CD when I upgraded to Dapper or Edgy, I just did a sudo /usr/bin/update-manager -c -d. Ubuntu used to have a text installer, which I actually liked. It wasn't as pretty as a gui, but it was fast and simple.

I used Dapper's live CD on my mother's computer, but wasn't really happy with the results. It was dog-slow, and I was wishing for the good old days of the text installer. On my computer, though, I was pleasantly surprised. It ran very smoothly, and aside from a few short freezes as the cd was accessed I couldn't tell it was a live cd. The difference is probably in the memory-- I have 512 MB, and she has 384. That extra 128 MB made a huge difference. By the way, Ubuntu installed fine on her computer, except it doesn't like her on-board Intel graphics. Right now she's stuck with 640 x 480 resolution, which just won't do the trick. I'm going to pick her up an nVidia card and give it another shot.

Used Ubuntu's disk partitioner to manually repartition my drive, I think it uses GParted. I don't use the default partitioning offered, I never really trust it, on any distribution. Selected the partitions I wanted manually, which was pretty easy. Installed Feisty and I'm now just installing programs and tweaking things to my liking.

I notice there's a "Restricted Drivers Manager" menu item. It seems to just be to install the nVidia drivers. It's normally easy enough to do from Synaptic, but it doesn't hurt to have an easy to find place to do it, I guess. There's also a "Desktop Effects" item, which also wants to install the nVidia drivers. That will enable Compiz, a compositing window manager. That just means your desktop have some neat effects, like transparency and wiggly windows and such. I'll give it a shot, but I was pretty happy with Beryl.

Apparently Feisty will offer to download the codecs needed to play multimedia files as well, like DivX or mp3. In the past you either had to download them yourself (not too tough, I think it was one or two packages from Synaptic), or use something like EasyUbuntu or Automatix. I'll see how that works.

Anyway, so far everything is working smoothly. Ubuntu set up my desktop resolution automatically with no problems, the nVidia driver is now installed and working, and the desktop effects are enabled. Just a matter of replacing my backup files, installing all the programs I like, and tweaking my desktop. Fun stuff. Saturday night has a lot to live up to.

Sunday, February 04, 2007

Make a Movie of Your Linux Desktop

Want to show off your snazzy 3d desktop, or demonstrate the features of your favourite new program? Make a movie of your desktop to capture all your actions, edit it, then add a soundtrack.

You need two pieces of software to accomplish this: xvidcap to capture the video and Avidemux to edit the movie and add a soundtrack. You may also need Audacity to shorten the audio file used for the soundtrack.

If your distribution doesn't have xvidcap in its repositories it can be downloaded from here. Debian and Ubuntu users will be able to use the .deb file, others will have to compile from source. Avidemux is most likely available in your repositories, but can be downloaded from here if it isn't.

It takes quite a bit of your system resources to record video while running applications, so you may have to do a bit of tweaking to get a decent framerate from xvidcap. Recording only part of your desktop will get you a better framerate. Click the "eyedropper" toward the right side of the window, then use the mouse cursor to select a region of the desktop to record. Or, if you want to record the full screen, you can lower the resolution of your monitor.

The other thing you can do is tweak the frame rate xvidcap records at. Right click on the file name at the left of the window and select Preferences.

Select the Multi-Frame tab, and lower the frame rate. You may have to experiment a bit with different resolutions and frame rates until you get an acceptable level of quality. You can also change the directory and file name the movie is saved to here.


When you are ready to record click the red Record button. xvidcap will record all your actions to the file specified. When you are finished, press the Stop button. You will be presented with a screen that will tell you the frame rate of your movie. Play it to see what it looks like. If the frame rate is too low it will play very quickly. Do some more adjusting of the frame rate, your resolution, and perhaps record a smaller region to improve the quality.

This is the vidcap I made of my desktop before any editing was done.


Once you are satisfied with the quality of your recording you will probably want to do some editing to remove things like the xvidcap window, long pauses, and stupid mistakes you may have made. We can use Avidemux to do some simple editing.

Open Avidemux, then open your movie. We are going to remove the bits of the movie we don't want. Click the A button at the bottom of the window to select the beginning of the section you wish to remove. In this example we are going to remove the section of the movie that shows me starting xvidcap.


Press Play, Next Frame, or use the scroll bar to go to the end of the part you wish to remove. Click the B button at the bottom of the window to select the end. Click the Edit menu item at the top of the window and select Delete. If you play the movie now you will see that the part you selected between the A and B markers is now gone.


This is a vidcap of the editing of the original vidcap. It's getting recursive now.


Do you want to add a soundtrack? I chose to use the song J-Nic Beatz by Andrew Stevens licensed under a Creative Commons attribution only license to perk up the video a bit. You may have to cut the length of the song down to the length of the video. Audacity is perfect for this.

In Avidemux with the video open select Audio at the top of the window, then Main Track. In the Audio Selector window select External PCM if your sound file is an uncompressed .WAV file, External MP2/3 if it is an MP3 file, or External AC3 if it is an AC3 file. Hit OK, choose the sound file you wish to use, then hit Save.

Here is our final edited Teenage Zombies video with sound.


These techniques can be used in a variety of different ways. Be creative! If you want to do some more advanced editing of your video, try Kino or KDEnlive. Experiment, post your video to the web, burn your new how-to video to DVD, show off what your computer can do.

Do you have any questions or suggestions on making desktop videos? What other programs would you use? Leave a comment or email me.

Saturday, February 03, 2007

Book Review: O'Reilly's Backup & Recovery

"No one cares if you can back up -- only if you can recover."

This is probably the most important point in this book. Using a variety of open source tools, you are shown how to backup, test and restore your Windows, Macintosh, Unix, or Linux systems, including filesystem and database backups. There is even a chapter that will help guide you in choosing a commercial alternative if the open source solutions don't meet your needs.

This is not a book for the beginner. It is aimed at professional systems administrators, although it contains useful information for anybody who needs backups. You should be comfortable with using command line tools and the shell. Having said that, the author (W. Curtis Preston) does an excellent job of explaining the various tools and concepts he presents. There are lots of examples given, and the most fun parts of the book are the real world examples of backups gone wrong.

The first two chapters provide an introduction to the concept of the book and basic backup principles. You are shown why backups are necessary and what should be backed up. Preston explains his philosophy of backing up the entire system, excluding what's not necessary, and automation. There are a lot of eye openers in the beginning chapters, and they should not be missed.

The next chapters cover the open source tools used to do backups and restores. Starting with basic tools such as cpio, dump, dd, tar and rsync for Unix and Linux systems, ditto for Mac OS, and ntbackup and System Restore for Windows, the book continues on with more advanced tools such as Amanda, BackupPC, and Bacula. The reader is walked through each program, with ample explanations and examples given.

How to achieve near-CDP (Continuous Data Protection) with open source tools is given a chapter of its own. rsync with snapshots, rsnapshot, and rdiff-backup are all explained, going over the advantages and disadvantages of each.

Commercial software and hardware are also covered. The author has chosen to not suggest specific utilities, but rather gives guidance on how to choose a backup solution that will meet your needs. The reasoning is that there are so many programs available that are constantly changing that a specific recommendation will soon be obsolete. It seems to be the "if you teach a man to fish" technique. If you are shown what to look for in a backup utility, you can see for yourself the benefits of the various programs available.

Bare-metal recovery, restoring the entire system from the operating system on up, is explained for Linux, Windows, MacOSX, and Solaris, HP-UX, and AIX Unix systems. Preston recommends testing all recoveries, but I found the technique here particularly interesting. He shows how to trash your hard drive so your root filesystem is completely lost. An effective way to see if you can build your system back from scratch. Of course, that's only recommended on a test system, not on an active server.

The chapters on database recovery are very extensive. It is not assumed that the reader is intimately familiar with the structure of databases, and there are plenty of explanations of the concepts of relational databases and the problems with backing them up. Oracle, Sybase, DB2, SQL Server, Exchange, PostgreSQL, and MySQL are all covered, sometimes with multiple backup solutions.

The final part of the book covers VMware, volatile filesystems, and other bits and pieces that didn't fit into the rest of the book.

A companion website is provided at backupcentral.com to cover additional material that didn't make it into the book as well as detailing changes that have happened since publication. A searchable online Safari version is also offered for a 45 day free trial.

Backup & Recovery is clearly written and is full of excellent advice and information. If you need to be able to get your system up after a disaster, you need this book.

Sunday, January 21, 2007

Simple DVD Re-Authoring in Linux

The other night I sat down with my girlfriend to watch Lord of the Rings: Fellowship of the Ring. It's one of the few movies we both enjoy and can watch over and over again. I noticed an odd thing after I inserted the DVD, however. The movie went straight to the menu. There were no previews, no studio splash screens, no advertisements, no videos telling me not to steal this movie that I had already paid for. It was refreshing.

Sometimes, though, when you put in a DVD you are subjected to endless previews, piracy warnings, and splash screens that can last minutes before you finally get to the menu. It's not too bad when you can skip them, but some DVDs disable the "next" button, forcing you to sit through them.

If it's a movie you only watch once or twice it may not be a big deal, but if it's one you want to see over and over again it is especially irritating. When this is done with kid's movies it's almost unforgivable, as they tend to enjoy watching the same video many times.

K9Copy will allow you to re-author your annoying, but beloved, DVD to skip all the content that annoys you, while letting you keep the movie and extras that you enjoy, resizing the movie to fit on a 4.7 GB disc if necessary. It will also let you put the original DVD away from harm. Any horrible accidents involving your DVD, peanut butter, and the dog will be restricted to the copy.

K9Copy should be available in your distribution's repositories. If not, there are packages for various distributions here.

We are going to re-author Shrek 2. It's a great movie, but there are almost 5 minutes of splash screens and previews before you are allowed to get to the menu, and they are not skippable. We're going to make a good DVD even better.

Insert the DVD into your DVD drive and open K9Copy. If you don't see a list of the DVD titles in the window, clicking on the folder at the top left will open the DVD.


Click on the top box beside the DVD disc title, in this case where it says SHREK_2. This will select all the titles, and we can now remove the ones we don't want.


Now we have a long list of titles, but what are they? Which to keep, and which to pitch? If you highlight a title (not a titleset) and press the camera icon at the top, it will play that title for you.


The first six titles (titlesets one through four) are either blank or annoying previews and splashscreens. We can uncheck those titlesets, and the movie and extras we want to keep will be intact.

If you want to keep the original menus, check the Keep original menus box at the bottom left hand corner, otherwise K9Copy will reauthor the DVD with no menus. If you decide to go with no menus you can select the order in which the titles will be played in the right pane of the window.


I only have the one DVD drive, and K9Copy has a nasty habit of crashing on me when the output device I select is the same as the input device, so I'm selecting ISO Image as the output, and we'll burn it to DVD separately.

Click on the DVD icon on the toolbar, and select where to save the ISO image. You'll have time for a coffee now, so go ahead. We'll wait.


We're almost done. Insert a blank DVD. If you use Gnome you can open Nautilus (the file manager), find the ISO image and right click it. Choose Write to Disc, and Nautilus will burn the image for you.

It's almost as easy in KDE. Right click the ISO image in Konqueror, select Actions, then Write CD Image with K3B.

Now you can watch the content you paid for in the way you want to, giving you back control of your DVD player.

Do you have any other suggestions or questions? Let me know by leaving a comment or emailing me.

Saturday, January 20, 2007

Making DVDs with DeVeDe

Mary-Ellen read my Blogcritics article about making DVDs in Linux, and after a little help was able to burn a DVD. The problem she's having is that there are clicks in the audio.

I've suggested changing the audio codec in Avidemux from the default Twolame to perhaps FFM MP2 or FFM AC3. Sometimes it takes a little experimentation until you hit the right mix. The problem, of course, is that transcoding can take a few hours and experimenting can be frustrating. You can cut down the time Avidemux takes to transcode at the expense of quality by selecting the DVD codec rather than the default 2-pass DVD (lavc) under Video on the left side of the Avidemux window. The best I can say is keep on trying. Even in Windows transcoding can be a frustrating experience.

The other option I suggested was to try another program to do the transcoding. DeVeDe uses another method to transcode video, so it may work where Avidemux doesn't. It can also author a DVD, but it won't create menus. If you want menus you can use another program such as DVDStyler to author it.

DeVeDe should be available in your distribution's repositories. Mary-Ellen uses Ubuntu, so she should be able to install it with Synaptic.

When you first open DeVeDe you are given the option of choosing different discs to create. Select Video DVD.


Under Files on the top rigtht of the window, click Add.


Select the file you want to convert. You also need to select the video format here. It defaults to PAL/SECAM, which is used in Europe, so if you live in North America you'll want to change this to NTSC.


Click OK. Now we want to choose how the converted file will be saved. Choose Only convert film files to compliant MPEG files if you want to save the file as an MPEG-2 file and author it with another program such as DVDStyler. I've shown how to use DVDStyler in my Blogcritics article.

Create disc structure will make a VIDEO_TS and AUDIO_TS folder with the menu files and VOB video files necessary to create a DVD. These can be used by a disc burning program to make a DVD.

We're going to Create an ISO or BIN/CUE image, ready to burn to a disk. Click that option, then click Forward.


Select where you want the image saved, and name it. Click OK.


DeVeDe will now spend some time transcoding the movie and creating the disc image. Time to have some dinner, watch TV, or have a nap.


Once it's done, we have to burn the image to a DVD. In Gnome it's really easy. Just open up Nautilus, the file manager, find the iso image, right click it, and select Write to Disc.


It's almost as easy in KDE. Find the iso file in Konqueror, right click it, go to Actions and then select Write CD Image with K3B. When K3B pops up, click Start.


That's it. I hope this helps. Let me know if you have any suggestions or problems. And I know the example movie I use is, umm, odd. It's for my next Blogcritics article, which I'm going to get to at any moment now. Really.

Monday, January 08, 2007

Playing Music on Linux

There are a lot of music players available for Linux. If most of them were junk it would be easy to choose one to use regularly, but that's not the case. There are many good quality players, but they all have different features. This article is meant to assist you in choosing the one that's right for you.

This list is by no means complete, but it should give you an idea of what's available.

XMMS


This is the old warhorse of graphical music players on Linux. There are a ton of plugins to extend its functionality as well as skins to change its appearance. The interface is simple if you just want to play music, but it is a bit clunky once you start getting into more advanced features. There are a lot of people that still use this one, but it is dated and some distributions (such as Gentoo) aren't including it anymore.

Noatun


Another simple media player for KDE. Plugins are available, and it is skinnable. It uses simple playlists and isn't a bad choice if all you want to do is play music.

Amarok


This is the player I use. In my opinion it is the most advanced player out there for Linux. Smart playlists, lyrics, album covers, tagging, information about the artists from Wikipedia, transfer music to and from digital audio players, an integrated music store (Magnatunes.com), and way more that I can't describe in the space I have.

Juk


Juk will organize your music into playlists, and can include album covers as well. It will also burn playlists as audio or data cds through K3b.

Rhythmbox


This is a decent music management program. You can create smart playlists, fetch podcasts, and create audio cds from playlists. The most recent versions support iPods and other portable audio players, although it did give me problems with my iPod Shuffle.

Quod Libet


No smart playlists, but it does have plugins for Wikipedia information on artist or album, album covers, burning to cd, and lots more.

Banshee


Banshee will burn selected songs onto an audio CD, supports cover art, and with plugins supports smart playlists, song recommendations through Lastfm.com, podcasts, and more. If Banshee was able to transfer music to my iPod Shuffle this is the player I'd be using, simply because it allows limiting the size of playlists based on MB.

Summary

If all you want is something that just plays music from a simple playlist Noatun is the way to go, although XMMS still has its fans.

If you want to be able to sync your portable audio player and want a music management system like iTunes, Amarok is a great piece of software. Banshee would be my recommendation if you don't need support for a digital audio player.

What did I miss? Do you have any other recommendations, or do you disagree with mine? Let me know by leaving a comment or emailing me.

Monday, January 01, 2007

Free Movies Redux


This is an edit of a previous post that I've changed to concentrate on Windows and VCDs (Video CDs) at the request of a friend.

First we want to get a movie that we can burn to a CD. A great source of free, public domain movies is Public Domain Torrents. You will need a bittorrent client to download the movies. uTorrent is what I use for Windows. For this example I've chosen to download Night of the Living Dead. It will take a few hours, perhaps overnight or longer, to download a movie depending on your connection speed and the size of the movie.

Once the movie is downloaded we have to convert it to a format that is readable by DVD players. We're going to use Avidemux. You can download the Windows version from here.

There are two types of VCDs: regular VCDs have a resolution of 352 x 240, about the same quality as VHS tapes, or Super VCDs that have 480 x 480 resolution, higher quality but will take more space than a regular VCD. A movie that might fit on one CD as a VCD will need to be put on two or more CDs if it is a Super VCD.

Also, not all DVD players will play SVCDs, but most will play VCDs. Check the specs of your player.

Once you've installed Avidemux open the movie, select Auto -> VCD or SVCD, hit Save, and relax for a couple of hours while it converts the movie.


Avidemux will automatically split the movie into two or more files so they will fit on a CD.

Once Avidemux is finished you should be able to burn the files to CDs with your CD burning program. Details will depend on your CD burning software, but I believe most CD burning programs will give you an option to burn VCDs. You may need a separate plugin to burn SVCDs because of licensing issues with the MPEG2 codec.

There are some other great resources for making video VCDs. The Internet Archive is another great source for public domain movies. Files are downloaded directly from their servers, so you don't need a bittorrent client, but sometimes can be slow. The video quality of the movies is also less, but there are a lot of them.

Sunday, November 26, 2006

Free Movies

Lots of free stuff in this post. Free software, free movies, free DVDs. Well almost. You have to supply the DVDs.

The software used in these steps will work for both Windows and Linux users, since most of it is cross-platform. Except where it isn't. But I'll let you know.

First we want to get a movie that we can burn to a DVD. A great source of free, public domain movies is Public Domain Torrents. You will need a bittorrent client to download the movies. For Windows I use uTorrent, in Linux I've started using KTorrent which has a lot of great features. For this example I've chosen to download Night of the Living Dead. It will take a few hours, perhaps overnight or longer, to download a movie depending on your connection speed and the size of the movie.

Once the movie is downloaded we have to convert it to an MPEG2 format that is readable by DVD players. We're going to use Avidemux. In Linux it's probably available in your package manager (it's in the Ubuntu repositories), and there is a Windows version.

Open the movie, select Auto -> DVD, hit Save, and relax for a couple of hours while it converts the movie.


Now the DVD has to be authored, which means we have to add menus and have the file system set up so a DVD player can read the disc.

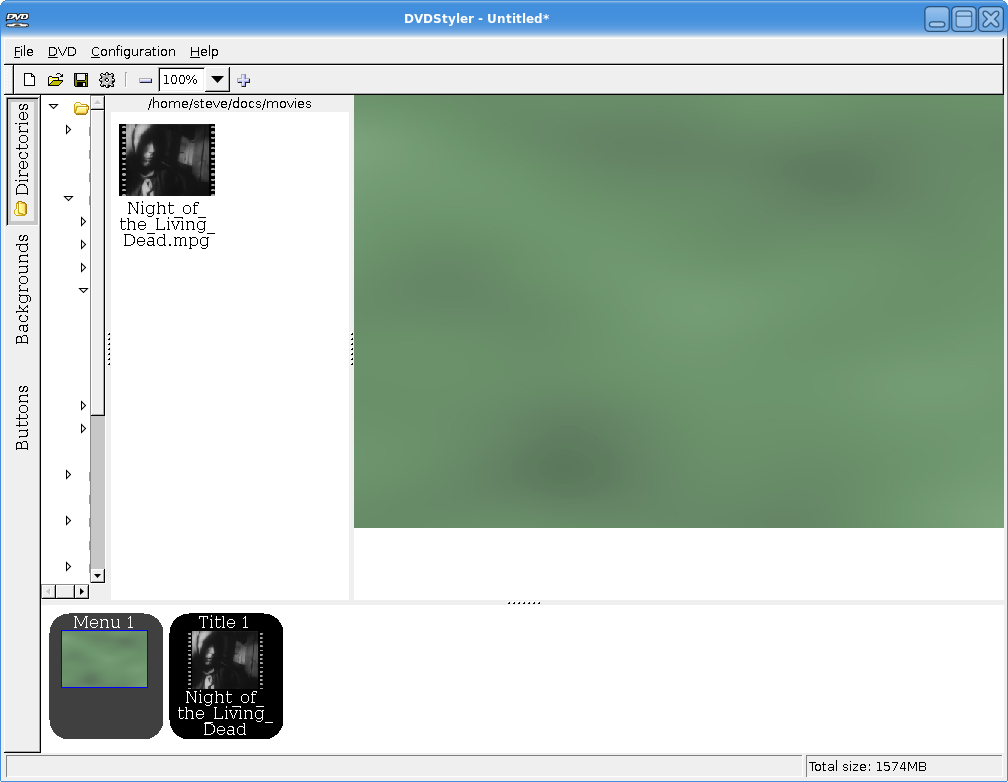
I had a lot of trouble deciding between different applications for authoring a DVD because there are so many good ones. I decided to focus on DVDStyler because it's easy to use, can create good looking menus, and is cross-platform, so it can work on both Windows and Linux. Oh yeah, and it's free. [Edit: The wxsvg library is now required for Linux users. You can download it from the DVDStyler website.]

Installation is easy. Windows users just download and run the Win32 binary on the download page. Linux users may have it in their package manager. It's not in the Ubuntu repositories, so I downloaded the Debian package and installed it.

For Ubuntu Linux users: Dapper users shouldn't need to change anything, but because I'm running Edgy Eft I did have to change an option in the settings because it kept throwing me an error about "jpegtopnm" [Update: These settings shouldn't have to be changed under Feisty Fawn]. To fix this you have to go to Configuration -> Settings, and in the Core tab change the first line to:

jpegtopnm "$FILE_IN" | ppmtoy4m -n 1 -I t -L $FRAME_RATE -S 420mpeg2 | mpeg2enc -f 8 -b $BITRATE -o "$FILE_OUT" $VIDEO_NORM

Don't worry, it's not as scary as it looks. Just copy and paste it in, you don't have to know what it means.

There are some excellent manuals and a forum to help you get started, but I'll go over the basics.

First thing we are going to do is choose a background for the menu. It comes with a bunch of backgrounds, but you can import your own if you like. Click the Backgrounds tab on the left and select the one you want.


Now select the Directories button on the left and navigate to the directory you saved the converted movie to. Only valid MPEG2 files will be available to select. Select your movie.


Now let's click the Buttons tab. Drag the "button1" image to the right, right click it, and select Properties. Since there is only one video on this disc the only thing we have to change is the button label, and the font if you wish.


Now you can select File -> Burn DVD from the main menu. Select Burn if you want to burn a disc right away, or you can Just Generate the file system or Create ISO Image if you want to burn the DVD with another program such as K3B.


After a few minutes you should be able to watch your shiny new DVD movie.

There are some other great resources for making video DVDs. The Internet Archive is another great source for public domain movies. Files are downloaded directly from their servers, so you don't need a bittorrent client, but sometimes can be slow. The video quality of the movies is also less, but there are a lot of them.

For authoring DVDs there is also DeVeDe which converts and authors the DVD, eliminating the need for a program like Avidemux. It is simple to use and can automatically divide a movie into chapters. It doesn't create menus though, and is only for Linux.

Tovid is another Linux only program that also converts movies and authors DVDs and allows you to create simple menus. I've had occasional weird issues with the sound not syncing. I can correct this by fast forwarding through part of the movie. It may be an issue with my DVD player. Well worth a try.


Sunday, November 12, 2006

Free Stuff

I like free stuff. If a task can be completed without dishing out money for an expensive piece of software, I'm all for it. Why spend money on bytes that could be better spent on more important things, like beer?

There is a lot of software available for free. Just like anything else, a lot of it is crap. A lot of free software actually comes with strings attached, like your personal information, ads, or important features that can only be used if you send the author money.

There are some real gems available if you know where to look. Software that is professional quality with no strings attached. Real alternatives to commercial applications.

I will be showcasing some of my favourite free applications, letting you know what I like and don't like about them, and where to get them. Hope you enjoy.

One of the most important apps for any user is the office suite. The most popular suite is, of course, Microsoft Office. It's an excellent application, with lots of wizards and templates to make tasks easier, and more features than any one person could ever need. It also costs a few hundred dollars, and they keep changing their file format every few releases just to remind everyone they have to upgrade to the newest version or risk not being able to read others' documents.

Another excellent office suite is OpenOffice. It is also has lots of wizards and templates, and more features than any one person could ever need. It is available for free, however. And while it has it's own file format, it can also read and save Microsoft Office documents, which means you will still be able to share documents with people who are broke because they've spent all their money on Microsoft Office. It's also multiplatform: it will run on Windows, Mac OS X, Linux, and FreeBSD.

OpenOffice comes with a word processor called Write, a spread sheet called Calc to replace Excel, presentation software (you know, like Powerpoint) called Impress, and a database application they call Base that replaces Access. There is also a drawing program called Draw.

The wordprocessor does what you would expect a word processor to do: process words. You can also do some neat things, like save your document in Adobe's .pdf format or in Aportisdoc format so you can transfer the file to your Palm device. It has lots of wizards to help with some of the more complex tasks, like mail merge.


The presentation software (called Impress) comes with templates, backgrounds, etc. and starts out with a wizard to help you create your slideshow. It can export your presentation as a Flash file, if you wish, allowing you to post it on the web. It does not come with as much artwork and backgrounds as PowerPoint, but you can download more from the web.


I use the spreadsheet only occasionally, for very basic tasks, but it's served my needs. I've been able to import Microsoft Excel files with no problems, but I understand that some people have had issues with complex Excel files with scripts.

I've never had need for the database, so I won't comment on it.

There are lots of extra templates and artwork available here and at the OpenOffice Extras website as well.

Don't let the fact that it's free fool you. OpenOffice is feature-rich enough for almost any personal or small business use. By not buying Microsoft Office this piece of software will free up money to buy enough beer to keep you drunk at work for a week.