Dual-booting does have it's disadvantages, though. The main one is that rebooting back and forth between operating systems wastes time, and prevents a smooth workflow. Virtualization technology allows you to run one operating system under another. Some of the advantages are that rebooting is no longer necessary, interactions between applications from different OSes are more integrated, such as copying and pasting, and you can, if you like, run multiple OSes at the same time.
There are disadvantages, however. Virtualization does take resources. Each additional OS will demand a certain amount of memory and hard drive space. Perhaps even more significant, from the point of view of the PC gamer, is the fact that as of now there is no reliable support for hardware accelerated 3D graphics.
VirtualBox runs on Linux, Mac OS X, and Windows. It can run a variety of OSes as guests, and is quite easy to install and configure. I'm going to be focusing on using Ubuntu as the host system and Windows XP as the guest system, but except for installation the instructions should be similar for any system.
The following instructions are quite lengthy and might look intimidating to a new user, but once the install of VirtualBox is finished it's mostly just following wizards. Very simple, really.
If you're running Ubuntu it should be available for installing from your repositories in the usual way, but the VirtualBox site has more recent versions packaged for various distributions here. Once you download the .deb file, right click it and open it with gdebi.
There are a couple things that have to be done to prepare your system for running VirtualBox. We're going to use the command line to do this. First, you need to add yourself to the vboxusers group. This can be done graphically, but it's actually simpler to do in a terminal. Open a terminal (in Gnome it will be under Applications --> Accessories) and copy and paste the following, substituting your username for (username):
sudo gpasswd -a (username) vboxusers
Now we need to load the VirtualBox module with:
sudo modprobe vboxdrv
sudo chmod 666 /dev/vboxdrv
To ensure the module gets loaded everytime you reboot we're going to add the module to /etc/modules. In the terminal copy and paste:
gksu gedit /etc/modules
You will be asked for your password and a text editor will open. It should look similar to this, although the exact modules listed may not be identical:
# /etc/modules: kernel modules to load at boot time.
#
# This file contains the names of kernel modules that should be loaded
# at boot time, one per line. Lines beginning with "#" are ignored.
fuse
lp
visor
At the bottom of the list add vboxdrv and save the file.
Start VirtualBox, either through the menu or by typing virtualbox in the terminal. You should see a window that looks like this:
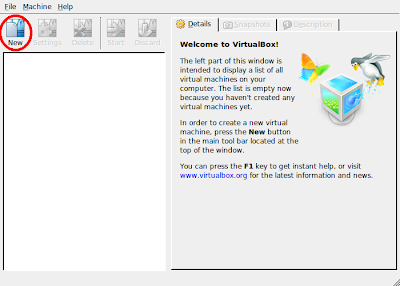
Click the "New" button at the top, and the "New Virtual Machine Wizard" will pop up. Click "Next", and you will see:
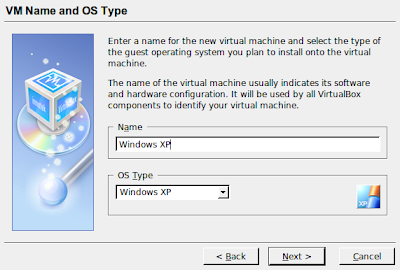
Name the new virtual machine anything you think is appropriate, and select the OS type you are going to install from the dropdown list.
Now you have to choose how much memory the guest system is going to use. You want enough memory to run XP with while leaving your host system with enough for it's needs. My machine has 2 GB of memory, so I was comfortable giving 512 MB to my virtual XP, but if you only have, for example, 512 MB on your computer you'll want to choose less. VirtualBox recommends 192 MB, but if you have to you could run XP with 128 MB, although it will be slow.
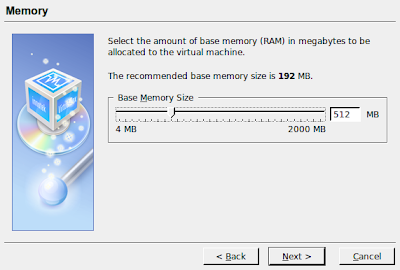
Click "Next". Now we have to make a virtual hard drive. Click the "New" button at the bottom of the window.
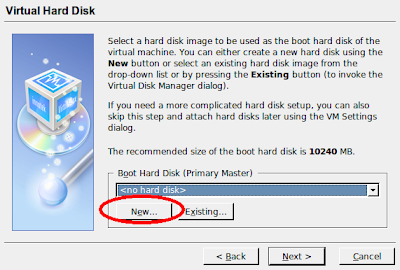
Another wizard pops up to help create the virtual disk. Click "Next" and you will see:
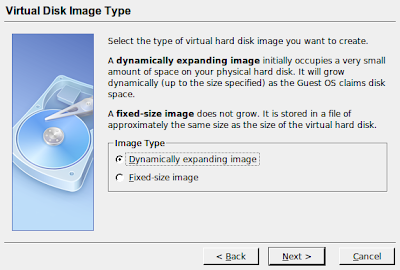
The explanations of the two disk types are clear. The dynamically expanding image is a little slower with disk writes until the image expands to it's maximum size, though. Choose one and click "Next".
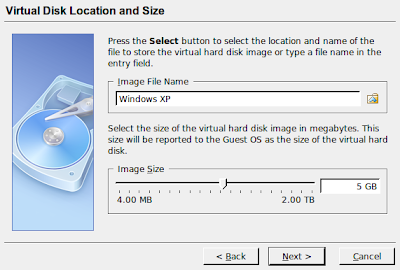
Choose a file name for the image and the size of the virtual hard disk. VirtualBox recommends 10240 MB of space, which is about 10 GB, but if you're not planning on installing many applications you could get away with an image size of 2 GB for Windows XP. After clicking "Next" you will see a summary screen:
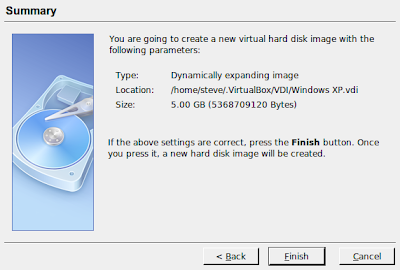
If you are happy with your settings click "Finish". We're back to this screen:
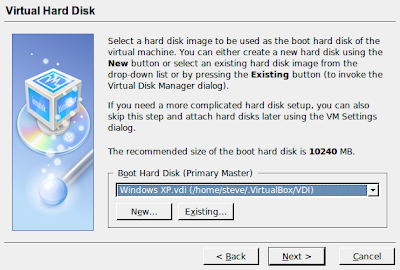
The virtual hard disk you just created should be already selected in the dropdown box. Click "Next" to get to the summary:
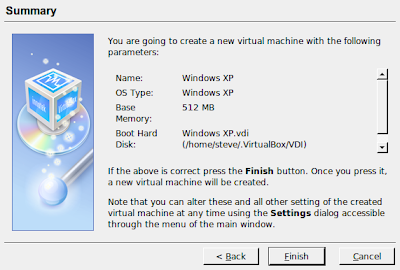
Click "Finish" to create your new virtual machine.
You will go back to the main window with your virtual machine in the left pane. Now we have to install the operating system. Click on your virtual machine and press "Start". You will be shown the "First Run" wizard which will help you choose how to install. You probably want to install from "CD/DVD-ROM Device", and select your drive from the drop-down list.
After clicking "Next" again insert your Windows XP installation disk and hit "Finish" on the screen that follows. Install Windows in the usual way.
We're still not quite done. Once Windows is installed you'll want to install the Guest Additions. This is a set of drivers and applications that allow for better mouse pointer integration, video support, shared clipboard between host and guest OSes, and shared folders to allow transfer of files between host and guest.
Click on "Devices" at the top of the window and choose "Install Guest Additions". Just follow the prompts and you'll be fine.
There are a couple of other tweaks you may want to make. Shut down Windows XP, and in the main "VirtualBox OSE" window select your virtual machine, then select "Settings". Here you can change things like the amount of memory used, media management, etc. Under the "Audio" tab you may want to enable sound. "Alsa Audio Driver" is probably your best bet for Host Audio Driver.
The "Shared Folders" tab will let you create a folder which you can transfer files between the host and guest OSes. In Windows XP you will access this folder as a network folder.
Hopefully I've covered most of the basics. There's lots more to play with, don't be afraid to experiment and try various options. If you have any questions, comments, or suggestions please feel free to leave a comment or email me.
3 comments:
So far the biggest challenge has been finding my Windows XP disk. Sigh, time to sort through those final unpacked boxes.
Why not just download and use TinyXP? Do you really need XP or would any OS do?
anoop:
You can use many different operating systems as guests with VirtualBox, including DOS, OS/2, Linux, BSD, and Solaris.
You could use Tiny XP as a guest operating system if you wanted to, but Tiny XP by itself is not virtualized. VirtualBox allows you to run a guest operating system within a host operating, doing away with dual booting.
Post a Comment